How to Rig a Wax Worm Under a Bobber for Bluegill
There's nothing quite as frustrating as seeing those perfect ripples on a calm Illinois pond, knowing bluegill are lurking just beneath the surface, but your bait just isn't getting their attention. Many new anglers, and even some seasoned ones, struggle with consistently hooking these feisty panfish, often overthinking their setup. This comprehensive guide is here to simplify your bluegill pursuit, showing you exactly how to rig a wax worm under a bobber, a time-tested method that promises more bites and unforgettable days on the water.
Why the Wax Worm and Bobber Rig is a Bluegill Angler's Best Friend
When it comes to bluegill fishing, simplicity and effectiveness often go hand-in-hand. The wax worm and bobber rig is a classic for a reason: it's incredibly easy to set up, highly effective at attracting bluegill, and provides an exciting visual cue when a fish takes the bait. This isn't just a beginner's trick; it's a fundamental technique that even experienced anglers rely on for consistent action.
The Irresistible Charm of a Wax Worm
Bluegill, like many panfish, are opportunistic eaters. They're constantly on the lookout for small insects, larvae, and other invertebrates that make up a significant portion of their diet. This is where the humble wax worm truly shines. These plump, soft-bodied larvae are packed with protein and emit a subtle scent that bluegill find utterly irresistible. Unlike some artificial baits that might require a specific presentation or retrieve, a wax worm simply needs to sit still or drift naturally to pique a bluegill's interest.
Think about it: when you're wading near a reedy shoreline or casting into a quiet cove, what are the bluegill naturally feeding on? Often, it's something small, wiggling, and nutritious that has fallen into the water or is simply drifting along. A wax worm perfectly mimics this natural food source. They're soft enough for even the smallest bluegill to mouth and swallow, which means fewer missed bites and more fish in your net. You can often find them at local bait shops, and sometimes even order them in bulk online from places like Amazon if you're planning a big fishing trip. Their vibrant, creamy color also makes them stand out underwater, adding to their allure.
The Simplicity and Effectiveness of a Bobber
A bobber, or float, is more than just a piece of plastic or cork that tells you when you have a bite. It's an essential tool that suspends your bait at a precise depth, keeps it visible, and provides the perfect amount of resistance for a bluegill to grab and run with it. The frustration of not knowing if your bait is too deep or too shallow, or if a fish is nibbling without you knowing, is completely eliminated with a properly deployed bobber.
Imagine fishing without a bobber: your wax worm would simply sink to the bottom, where it might get lost in weeds or mud, out of sight from the bluegill actively feeding in the water column. The bobber keeps your bait suspended right where the fish are, typically in that crucial zone above submerged vegetation but below the surface. This controlled depth presentation is critical for consistent bluegill success. Moreover, the visual thrill of watching your bobber dip, dance, and then disappear under the surface is arguably one of the most exciting moments in fishing, especially for kids. It removes much of the guesswork and makes the experience far more engaging and rewarding. For an excellent primer on setting up for panfish, check out our guide on the Best Panfish Setup for Kids.
Perfect for Anglers of All Skill Levels
One of the greatest virtues of the wax worm and bobber rig is its universal appeal. It's the quintessential "first rig" for children, offering immediate visual feedback and a high chance of success, which is crucial for building enthusiasm. But don't mistake its simplicity for a lack of sophistication. Even experienced anglers turn to this setup when the bite is tough, or when they want to target bluegill specifically.
For beginners, this rig teaches fundamental fishing concepts: casting accuracy, setting the hook, and understanding how fish feed. There’s no complex retrieve or advanced lure presentation to master. You simply cast, watch, and react. For those teaching kids to fish, it’s an absolute godsend. It allows them to focus on the joy of catching, rather than grappling with complicated tackle. And for seasoned pros, it offers a relaxing, back-to-basics experience that often yields a cooler full of delicious panfish. It's truly an ideal method for anyone looking for the Easiest Fish to Catch for Beginners.
Essential Gear for Your Wax Worm and Bobber Setup
While the wax worm and bobber rig is simple, having the right components can significantly enhance your success and enjoyment. You don't need top-of-the-line, expensive equipment, but understanding the purpose of each piece will help you make informed choices, whether you're buying new gear or just digging through your old tackle box.
Choosing the Right Rod, Reel, and Line
For bluegill fishing with a bobber, you'll want light tackle that's sensitive enough to feel the subtle tugs and flexible enough to cast small, lightweight rigs.
- Rod: A light to ultralight spinning rod, typically 5 to 6.5 feet long, is ideal. These rods have a sensitive tip that will telegraph even the slightest bite and enough backbone to handle a feisty bluegill. The lighter action allows for more accurate casting of small baits. If you're targeting bluegill specifically, you really don't need anything heavy duty. A flexible rod also makes fighting these smaller fish a lot more fun. For deeper dives into rod choices, our guide on Ultralight Tackle for Panfish Fishing has more excellent suggestions.
- Reel: Pair your ultralight rod with a small spinning reel (typically a 500 to 1000 size). These reels are designed for light lines and smaller baits, offering smooth retrieves and adjustable drag systems to prevent your line from snapping when a bigger fish decides to take your wax worm. A good quality, inexpensive spinning reel will serve you well for years. You can find many reliable options on Amazon for starting out.
- Line: For bluegill, a light monofilament or fluorocarbon line in the 2 to 6-pound test range is perfect. Monofilament is often preferred for bobber fishing because it floats, which can help keep your bobber positioned correctly and makes it easier to mend your line. Fluorocarbon is less visible underwater and more sensitive, but it sinks, which might require a different approach depending on conditions. Avoid heavy braided lines as they can be overkill and make rigging a bit more challenging with small hooks.
Selecting the Perfect Bobber for Visibility and Sensitivity
Bobbers come in many shapes, sizes, and materials, and choosing the right one can make a noticeable difference in your bluegill catch rate. The key is to match the bobber to the bait and the fishing conditions.
- Spring-clip Bobbers: These are the most common and easiest to use, perfect for beginners. They typically have a small spring-loaded hook on the top and bottom that clips directly onto your line. They're quick to adjust depth, which is a huge plus when trying to find where the bluegill are holding. Round or oval shapes are standard.
- Slip Bobbers: For more advanced applications, especially when fishing deeper water or needing to cast further, slip bobbers are fantastic. They "slip" freely up and down your line, stopping at a small knot (a bobber stop) that you can slide to set your depth. This allows you to reel your bait right up to the rod tip for easy casting, and then the weight of your sinker pulls the line through the bobber to the set depth.
- Bobber Size and Color: Choose the smallest bobber that will effectively float your bait and any necessary sinkers. A smaller bobber offers less resistance to the fish, making them less likely to drop the bait. Bright colors like red and white, or fluorescent orange, offer excellent visibility against the water, helping you spot even the most subtle bites.
| Bobber Type | Pros | Cons | Ideal Conditions |
|---|---|---|---|
| Spring-clip | Easy to attach and adjust | Can cause line memory, limited depth setting | Shallow water, short casts, beginners |
| Slip Bobber | Allows deep fishing, long casts | More complex setup with bobber stops and beads | Deeper water, longer casts, experienced anglers |
| Fixed (Wagler) | Very sensitive, precise bait presentation | Limited depth adjustment | Calm water, close-range fishing |
Hook Selection: Size Matters for Bluegill
Bluegill have relatively small mouths, so using the correct hook size is crucial for successful hook-sets. Too large, and they can't get it in their mouth; too small, and they might swallow it too deeply, making release difficult.
- Hook Type: A small, light-wire Aberdeen hook or a fine-wire circle hook are excellent choices. Aberdeen hooks have a long shank that makes them easier to remove, and their fine wire helps prevent excessive damage to the wax worm. Circle hooks are fantastic for conservation, often hooking the fish in the corner of the mouth, making for easy release.
- Hook Size: For most bluegill, a size 6, 8, or even 10 hook is perfect. A size 8 is a good all-around choice. Experiment with different sizes based on the average size of the bluegill you're catching in your specific Illinois fishing spot. Remember, the smaller the number, the larger the hook, so a size 6 is larger than a size 10. A small, sharp hook will penetrate easily into the bluegill's mouth.
Step-by-Step Guide to Rigging Your Wax Worm Under a Bobber
Now that you have your gear, let's get down to the nitty-gritty of putting it all together. This process is straightforward and, with a little practice, you'll be rigging up in no time, ready to enjoy some fantastic bluegill action on your favorite Illinois lake or pond.
Attaching Your Bobber
The first step in your bluegill setup is getting that bobber onto your line. The method will vary slightly depending on whether you're using a spring-clip or a slip bobber.
- For a Spring-clip Bobber: This is arguably the easiest way to go. You'll notice a small button or spring mechanism on the top of the bobber and a hook at the bottom. Press the button on top, which will expose a small wire loop. Thread your fishing line through this loop. Once your line is through, release the button, and the wire will spring back, pinching the line. Do the same with the bottom clip. Make sure the line is securely held by both clips. The beauty here is that you can easily slide the bobber up or down your line to adjust your fishing depth without re-tying anything. This flexibility is great for figuring out where the bluegill are feeding at places like Rend Lake's Best Spots for Early Spring Crappie, where depths can vary.
- For a Slip Bobber: This takes a tiny bit more effort but offers much more versatility, especially for casting further or fishing deeper water. First, slide a bobber stop onto your main line. This is a small piece of string or rubber that you can slide up and down your line. After the bobber stop, thread a small bead onto your line (this prevents the bobber from sliding over the bobber stop knot). Next, thread your line through the eye of the slip bobber. Now, your bobber can "slip" up and down between the bead and your terminal tackle, stopping at the bobber stop. To adjust your depth, simply slide the bobber stop up or down your line.
Tying on Your Hook
Once your bobber is in place (or ready to slip), it's time to attach your hook. For small hooks, a simple knot like the Improved Clinch Knot or a Palomar Knot works wonderfully. The key is to moisten your line before tightening the knot to ensure it cinches down properly and maintains its strength.
Let's walk through the Improved Clinch Knot, which is a go-to for many anglers:
- Thread the line: Pass the end of your fishing line through the eye of the hook.
- Twist: Double back the tag end and make 5-7 twists around the standing line (the main line going back to your reel).
- Insert: Pass the tag end through the small loop formed just above the eye of the hook. Then, pass it through the larger loop that just formed above the twists.
- Moisten and Pull: Moisten the line with a little saliva (this reduces friction and heat when tightening). Slowly pull the standing line to tighten the knot, making sure the coils gather neatly.
- Trim: Trim any excess tag end, leaving about 1/8 to 1/4 inch.
This knot is strong, reliable, and relatively easy to tie, even with small hooks. For more on beginner setups, consider reviewing Best Beginner Bluegill Fishing Setup.
Baiting Your Hook with a Wax Worm
This is where the magic happens! Properly baiting your hook with a wax worm maximizes its appeal and increases your chances of a solid hook-set.
- Choose your worm: Select a lively, plump wax worm.
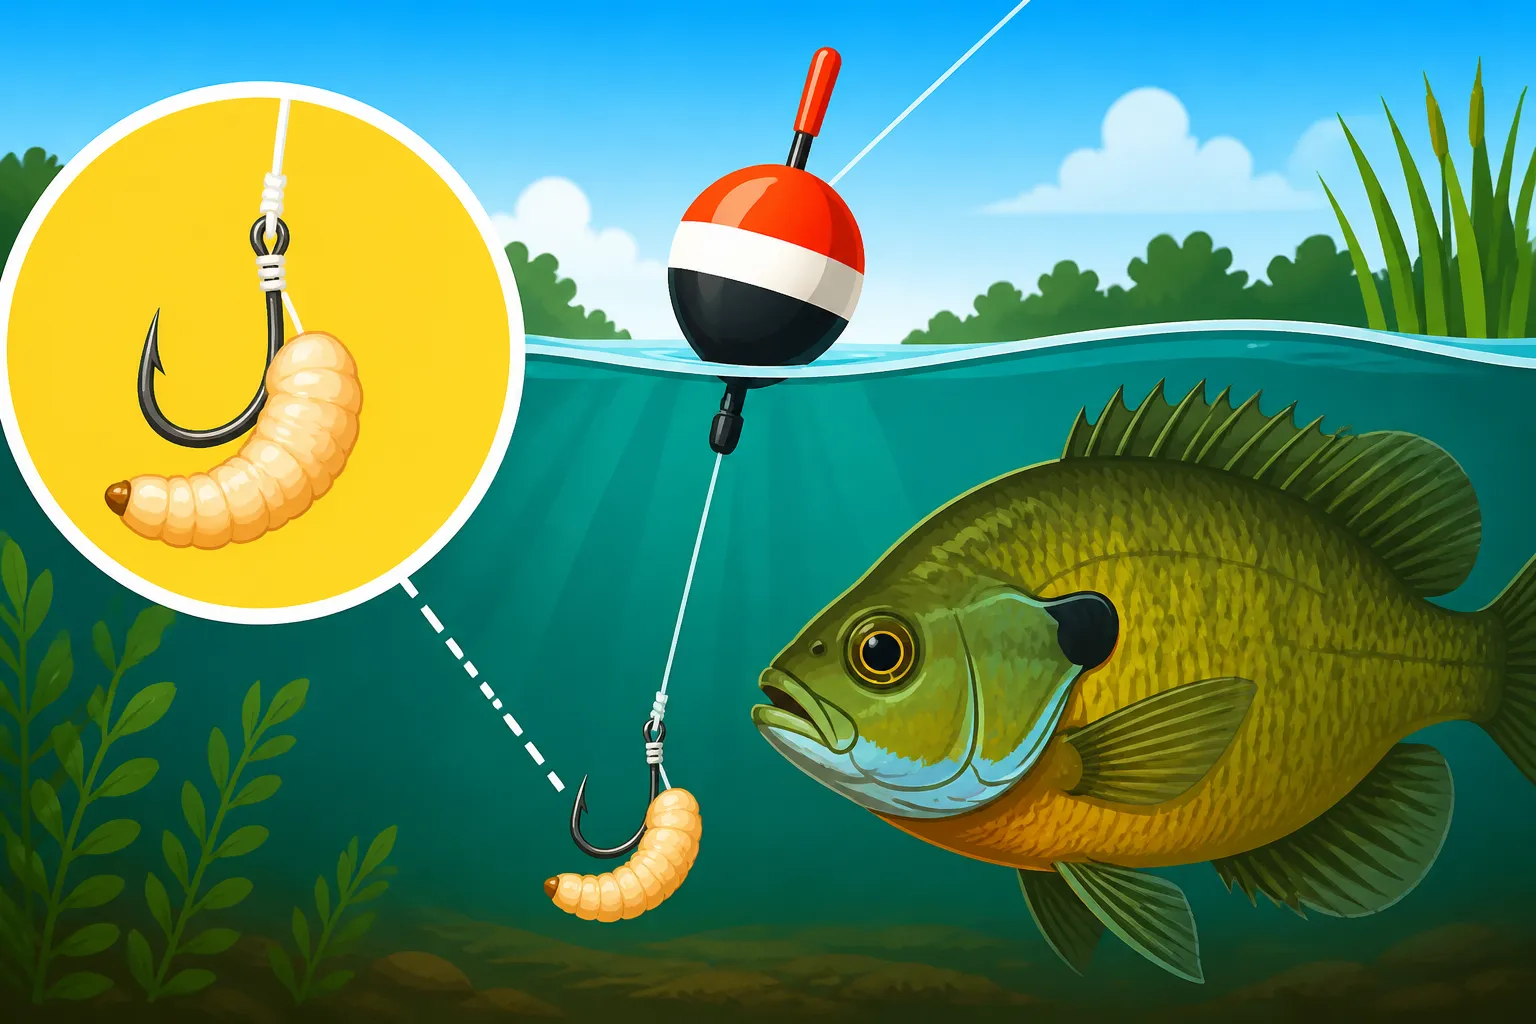
- Hook through one end: Gently push the hook point through one end of the wax worm, typically the head end. You want to thread it just enough so that the hook point emerges from the body, leaving the majority of the worm dangling naturally.
- Expose the point: Make sure the hook point and barb are completely exposed. This is critical for a good hook-set. If the hook point is buried in the worm, it's much harder to get a solid connection with the bluegill's mouth. The goal is for the wax worm to look as natural as possible while still offering an easy target for the fish and a clear path for your hook. For even more bait choices for these panfish, consult our guide on Best Bait for Bluegill Fishing.
Tips and Tricks for Bluegill Success with Your Rig
Rigging is just the first step. To consistently catch bluegill with your wax worm and bobber setup, you need to understand how to present your bait, where to find the fish, and how to react when that bobber starts to dance.
Adjusting Your Depth and Location
Bluegill are often found near structure or cover, and their feeding depth can change throughout the day and with different weather conditions. This means you need to be flexible and willing to adjust your rig.
- Start shallow, go deeper: A good starting point is to set your bobber so your wax worm is about 1 to 2 feet deep. Bluegill often feed in relatively shallow water, especially in the mornings and evenings or during the spawn. If you're not getting bites after 15-20 minutes, gradually increase your depth by moving your bobber up your line in 6-inch increments.
- Target structure: Look for visible cover like fallen trees, lily pads, docks, or even shaded areas along the bank. Bluegill use these spots for protection from predators and as ambush points for insects. Casting your wax worm near these areas, but not directly into thick cover where you might get snagged, is often highly productive. Our guide on How to Catch Bluegill From the Bank offers more location insights.
- Consider the weather: On sunny days, bluegill might move into deeper, cooler water or seek shade. On overcast days, they might be more active in shallower areas. Pay attention to how the fish are reacting and adjust accordingly.
Presenting Your Bait Naturally
While the bobber keeps your bait suspended, how you cast and allow it to sit can make a big difference. The more natural your presentation, the more likely a bluegill is to commit.
- Soft casts: Don't violently cast your rig. A gentle lob cast that allows the bobber and bait to settle softly on the water's surface is best. A loud splash can spook cautious bluegill.
- Minimal movement: Once your rig is in the water, let it sit for a bit. Bluegill are curious, and a slowly sinking or naturally drifting wax worm can often trigger a bite. If there's a gentle breeze, let your bobber and bait drift slowly along with the current or wind. This natural movement can be very enticing. Avoid constantly reeling in or twitching your rod unless you're trying to cover more water after no bites.
- Patience is key: Sometimes, bluegill need a moment to inspect the bait. Don't pull your rig out too quickly if you don't get an immediate bite. Let it sit for a few minutes before recasting to a new spot.
Reading the Bite and Setting the Hook
This is the moment of truth! Watching your bobber is essential, and understanding the different types of bites will help you know when to set the hook.
- The subtle twitch: Sometimes, a bluegill will just "test" the bait. Your bobber might twitch slightly, wiggle, or just slowly move horizontally. These are often smaller fish or very cautious ones.
- The dip and run: The classic bluegill bite is a sudden dip of the bobber, often followed by it moving horizontally as the fish swims off with the bait. This is a clear signal to set the hook!
- The disappearing act: The most exciting bite is when your bobber simply vanishes underwater. This means a bluegill has committed and is pulling the bait down.
Setting the Hook: When you see a definitive bite (a dip and run or disappearing act), quickly and smoothly lift your rod tip upward and backward. Don't yank it violently, as this can tear the hook out of the fish's mouth or break your light line. A gentle but firm upward sweep is usually all it takes. With light tackle, you'll immediately feel the tug of the bluegill, and the fight is on! Learning How to Teach a Kid to Fish for Panfish often begins with this exhilarating moment.
After a successful hook-set, reel the fish in steadily. Bluegill are known for their feisty fight, especially for their size, so enjoy the experience! Once you land your fish, decide whether to keep it (check Illinois's local regulations for specific catch limits) or release it gently back into the water to grow larger. With practice, you'll be able to consistently land bluegill, making your next Illinois fishing trip a truly productive and enjoyable adventure.
Disclaimer
This article is for general informational purposes only and does not constitute professional advice. Laws, prices and regulations vary by location and change over time. Consult a qualified professional for guidance on your specific situation.